
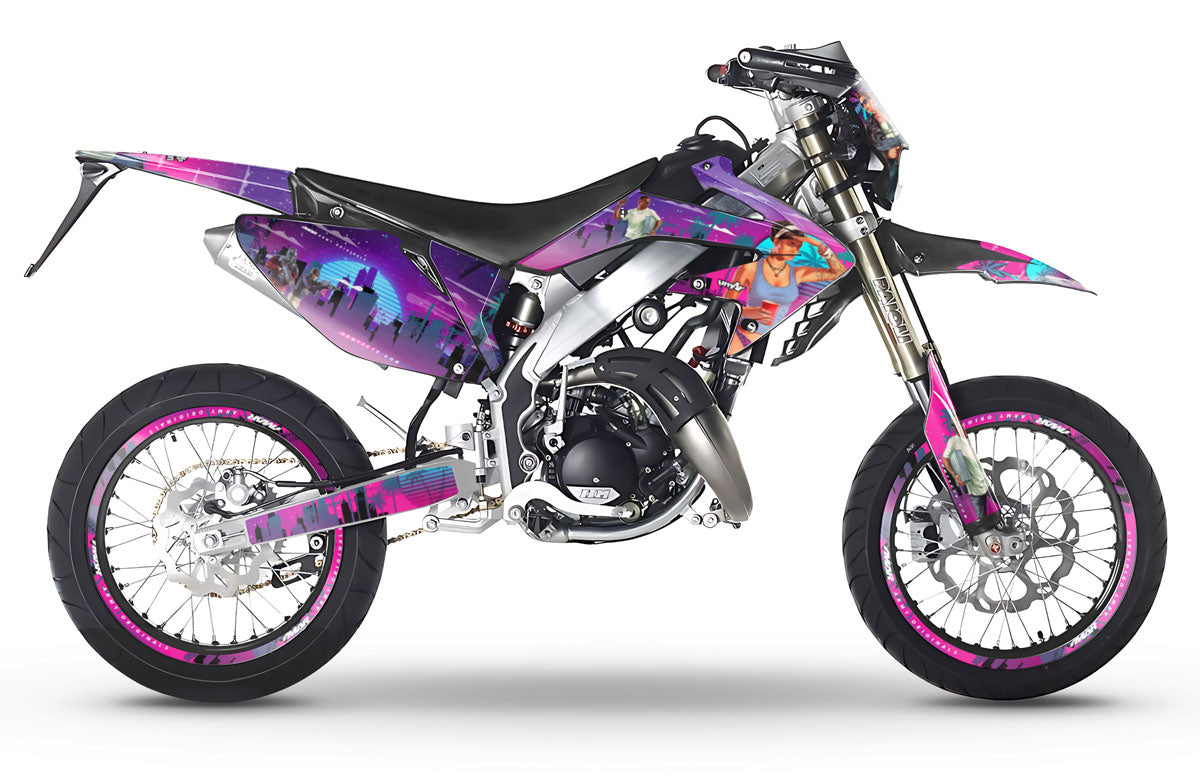
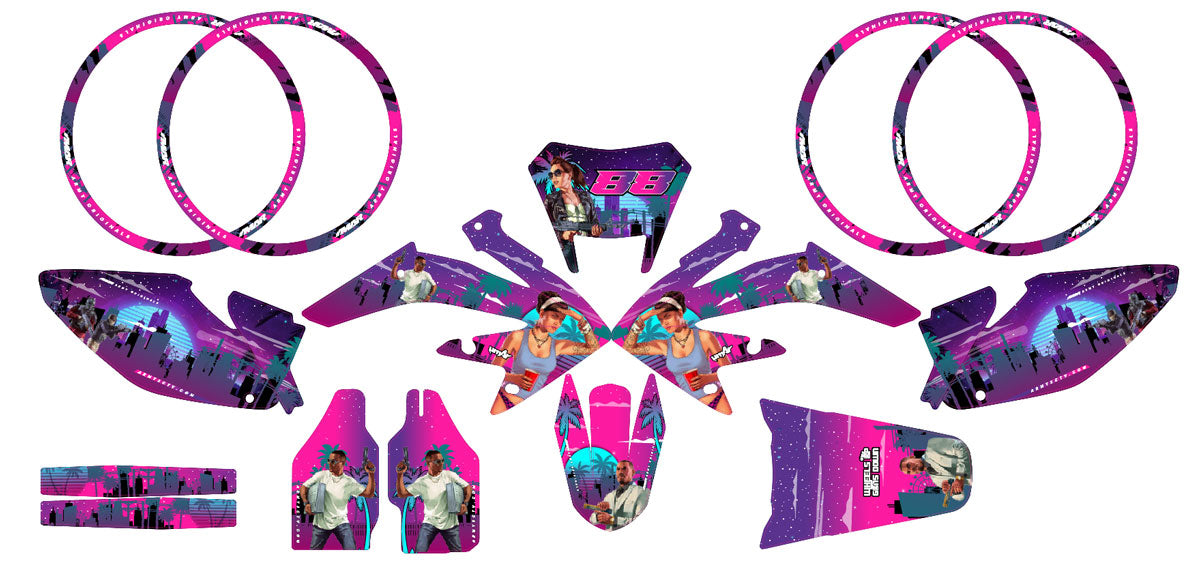


Kit grafiche HM CRM 50 Derapage GTA Style
Bozza approvata prima della stampa | zero sorprese!
Pose facile, sans bulles
Maquette 24/48h
Modifications illimitées
Vinyle premium anti-UV


Descrizione del prodotto
Kit grafiche HM CRM 50 Derapage – Modello GTA Style
Trasforma la tua HM CRM 50 Derapage in una moto dal look urbano e d’impatto con il kit grafiche GTA Style, una creazione originale di ArmySCTV. Ispirato alla street art e alla cultura urbana, questo design distintivo dona alla tua 50cc uno stile unico e deciso.
Realizzato in vinile premium ultraresistente con adesivo antibolle, questo kit garantisce un’applicazione facile, un’aderenza perfetta e una durata eccezionale. La stampa HD a 8 colori offre grafiche dettagliate, brillanti e resistenti ai raggi UV, ai graffi e agli agenti atmosferici.
Caratteristiche principali
- Design esclusivo “GTA Style” – ispirato all’universo urbano e alla street art.
- Stampa ad alta definizione a 8 colori per immagini precise, intense e professionali.
- Finiture premium disponibili: opaca, lucida, olografica, cromata, glitterata, goffrata, fluorescente.
- Personalizzazione completa: possibilità di aggiungere nome, numero, loghi o modificare i colori.
- Tagli precisi perfettamente adatti alle carene HM CRM 50 Derapage.
Compatibilità
Questo kit grafiche è progettato esclusivamente per la HM CRM 50 Derapage. In caso di differenze o modifiche alle carene, offriamo adattamenti su misura per un risultato impeccabile.
Perché scegliere ArmySCTV?
- Specialista dei kit grafiche per 50cc: ampia gamma per HM, Derbi, Beta, Fantic, Rieju e molto altro.
- Qualità professionale: vinili resistenti, stampa HD e finiture di alta gamma.
- Servizio su misura: personalizzazione grafica, assistenza completa e guida all’applicazione inclusa.
Consigli per l’installazione
Prima dell’applicazione, pulisci e sgrassa accuratamente le carene. L’adesivo antibolle facilita il posizionamento e consente un riposizionamento preciso. Utilizza una fonte di calore delicata per le zone curve. Ogni kit include una guida dettagliata all’installazione per un risultato professionale.
Con il kit grafiche GTA Style per HM CRM 50 Derapage, dona un’identità urbana e d’impatto alla tua moto. ArmySCTV trasforma la tua 50cc in un’opera grafica pronta a distinguersi sulla strada.
Specifiche del vinile da stampa
| Tipo di vinile | Caratteristiche tecniche |
|---|---|
| Lucido | Vinile polimerico bianco flessibile con tecnologia FLO®, che consente un’applicazione senza bolle e una stampa dai colori intensi. |
| Olografico | Vinile polimerico olografico con tecnologia FLO®, che offre un’applicazione senza bolle e un’opacità maggiore grazie a un adesivo pigmentato grigio chiaro. |
| Cromato | Vinile ultra-aderente per plastiche difficili, disponibile in Cromo argentato e Cromo olografico. La tecnologia FLO® elimina le bolle e facilita l’installazione. |
| Fluo / Neon | Vinile colato neon con tecnologia FLO®, dotato di un adesivo ultra-aggressivo per un’aderenza ottimale su tutte le superfici. |
Specifiche dei vinili di laminazione
| Tipo di vinile | Caratteristiche tecniche |
|---|---|
| Brillante | Pellicola vinilica trasparente e flessibile con adesivo acrilico otticamente trasparente. Garantisce una protezione ottimale e una finitura brillante. |
| Glitter | Pellicola vinilica trasparente con glitter ed effetto olografico. Dona una brillantezza unica e protegge a lungo le stampe. |
| Testurizzato | Pellicola vinilica testurizzata che offre una maggiore aderenza. Ideale per una protezione rinforzata e un grip migliore. |
| Opaco | Pellicola vinilica opaca con finitura antiriflesso. Protezione duratura mantenendo un aspetto discreto ed elegante. |
Consigli per l'installazione
Segui questi 4 semplici passaggi per installare il tuo kit decorativo olografico sul tuo kit decorativo per moto 50cc e ottenere un risultato professionale:
-
Preparazione della Superficie:
Pulisci accuratamente la zona di applicazione del tuo 50cc con uno sgrassatore delicato per rimuovere polvere, sporco e tracce di olio. Una superficie pulita è essenziale affinché il tuo kit decorativo olografico aderisca correttamente.
-
Misurazione e Marcatura:
Misura con precisione la zona da decorare sul tuo kit decorativo per moto 50cc. Utilizza una matita non permanente per segnare leggermente i contorni e facilitare l'allineamento del vinile durante l'applicazione.
-
Applicazione del Vinile/Adesivo:
Stacca parzialmente il supporto del vinile o dell'adesivo. Posizionalo con cura sulla zona contrassegnata, quindi rimuovi gradualmente il supporto lisciando il materiale con una spatola o un panno in microfibra per eliminare le bolle d'aria e garantire un'adesione perfetta.
-
Finiture e Verifica:
Verifica che il vinile sia ben fissato su tutta la superficie del tuo kit decorativo per moto 50cc. Rimuovi la pellicola protettiva ed esegui i ritocchi necessari per valorizzare l'effetto unico del tuo kit decorativo olografico.
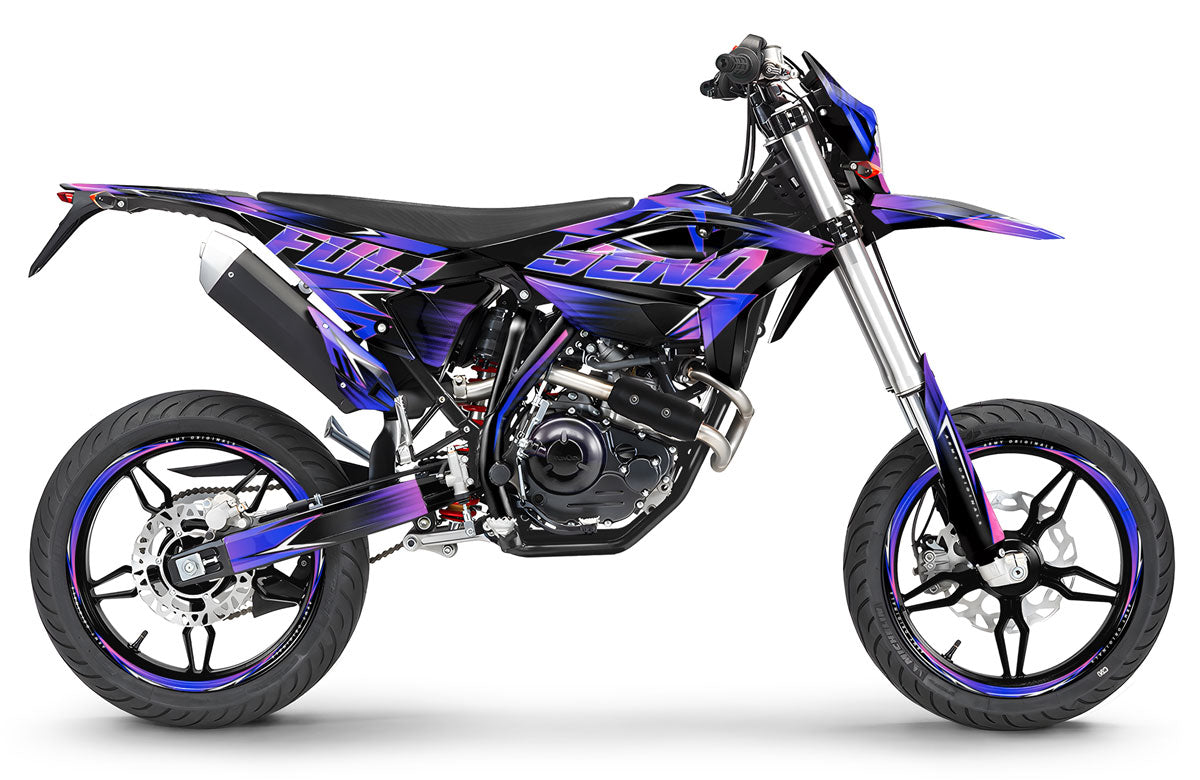
Perché scegliere i nostri kit grafici per moto, cross e scooter?
Kit di adesivi decorativi di alta gamma per tutti i tuoi veicoli: 50cc, 125cc (come qui sulla Beta RR), Motocross, Supermotard, ma anche E-bike e Maxi Scooter. Realizzati con materiali premium ArmySCTV, i nostri adesivi garantiscono un'applicazione facile senza bolle e una resistenza estrema. Scegli un design semi-personalizzato o su misura e dai uno stile unico alla tua moto.
È possibile personalizzare il mio kit déco (nome, numero, colori)?
Assolutamente. Offriamo diversi livelli di personalizzazione. Sui nostri kit "semi-personalizzati" puoi modificare il numero di gara, il nome del pilota e i colori dello sfondo e dei portanumero per abbinarli alle tue carene. Per una modifica completa (aggiunta di sponsor specifici, cambio radicale del design), scegli le nostre opzioni "Full Perso" oppure contatta il nostro servizio di grafica.
Posso vedere un'anteprima prima della stampa?
Sì, per ogni ordine che include una personalizzazione, inviamo via email un mockup digitale (BAT). La produzione del vostro kit grafiche moto/quad inizia solo dopo la vostra approvazione definitiva. Questo garantisce 0 errori e un risultato conforme al 100% alle vostre aspettative.
Qual è lo spessore e la qualità del vinile utilizzato?
Utilizziamo un vinile di alta gamma appositamente progettato per gli sport motoristici estremi (Motocross, Enduro, Quad, Karting). I nostri kit offrono uno spessore totale compreso tra 300 e 500 micron (a seconda della finitura scelta), garantendo una resistenza ottimale a graffi, urti, pietre e sfregamenti degli stivali.
Il kit decorativo è resistente ai raggi UV e al lavaggio ad alta pressione?
Sì. I nostri adesivi sono dotati di una colla rinforzata ad alto potere adesivo e di una laminazione anti-UV. Questo impedisce ai colori di sbiadire al sole. Puoi lavare il tuo veicolo con l'idropulitrice, assicurandoti semplicemente di mantenere una distanza di sicurezza (circa 30-40 cm) e di non insistere sui bordi degli adesivi.
Come applicare facilmente il mio kit decorativo senza fare bolle?
L'applicazione dei nostri kit è facilitata dalla tecnologia del nostro adesivo, che permette di eliminare l'aria ("Bubble Free"). Ecco i passaggi chiave per un'applicazione perfetta:
- Sgrassate perfettamente le plastiche (nuove o usate) con un detergente per freni o alcool isopropilico.
- Riscaldate leggermente il vinile con una pistola termica o un asciugacapelli per renderlo flessibile.
- Applicatelo partendo dal centro verso l'esterno.
- Lasciate riposare il kit per 24-48 ore prima di guidare, affinché l'adesivo polimerizzi (si indurisca) completamente.
Il kit è compatibile con le plastiche originali e aftermarket (UFO, Acerbis, Cycra)?
I nostri template sono estremamente precisi. Al momento dell'ordine, è fondamentale specificare l'anno, il modello esatto e se avete sostituito le carene con prodotti di marchi come UFO, Acerbis, Polisport o Cycra. Adatteremo i tagli di conseguenza per un "fit" perfetto.
Quali sono i tempi di produzione e spedizione?
Poiché ogni kit viene stampato su richiesta per garantire la freschezza dell’adesivo, considera:
- Grafica: da 2 a 4 giorni lavorativi.
- Produzione (Stampa e asciugatura): da 3 a 5 giorni lavorativi dopo la convalida.
- Consegna: da 24 a 48 ore tramite i nostri corrieri partner.
Considera circa da 8 a 10 giorni lavorativi in totale per ricevere a casa il tuo kit di adesivi personalizzato.
Finiture di alta gamma:
Vinili olografici, cromati e lucidi

STAMPA
Holo / Chrome
Riflessi olografici dinamici per un look futuristico e personalizzato.

STAMPA
Lucida / Opaca
La finitura lucida intensifica i colori, quella opaca offre uno stile sobrio ed elegante.

STAMPA
Fluo / Neon
Colori ultra vivaci per uno stile racing moderno e la massima visibilità.

FINITURA
Galactic Series
Finitura glitter cosmica per un effetto lussuoso, profondo ed esclusivo.

FINITURA
Holo Spectrum
Effetto olografico multicolore con spettacolari riflessi prismatici.

FINITURA
Ultracurve
Superficie lucida con sfumature fluide per uno stile moderno e premium.